Optimize Remember The Milk With Smart Lists
Task lists are great, but what if you only want to see part of your task list at a time? Say, the tasks near where you are? Or the tasks that are due within the next week? Some systems would have you keep separate lists. But a feature within Remember The Milk called Smart Lists, provides it with no extra work. Today we will look at how to optimize Remember The Milk with Smart Lists.
When Getting Things Done* first came out, the concept of “context” was new. David Allen maintained that when you are in your office, you should see only tasks that can be done in your office. When you are at your computer, you should see tasks that can be done at the computer. I loved this concept. Finally, a way to segregate the endless task list and make it so I could get thing done all at once!
But the problem is that they had to be maintained in separate lists. So I had to set up several task lists, and make sure all the tasks were appropriately filed. A problem entered when I had two contexts. Let’s say I had a task that could be done on my phone OR my computer. Which list does it go on? And what about the task that had to be done at the office AND on the computer?
Enter Remember The Milk and Smart Lists.
What is a Smart List?
A Smart List is essentially a saved search. Remember The Milk has a powerful search feature that allows you to find tasks any which way; Smart Lists are a way to save the searches for frequent use.
The power behind Smart Lists is that you can keep all your tasks in one place and use the search to narrow down what you can work on in any context.
Setting Up A Smart List
Let’s say your planning works from a list where the task is either due today (or before today) or it has been prioritized. That way you can see all of the tasks that are overdue, due today, or that you have decided are the priority for the day.
The search for this in Remember The Milk is straightforward:
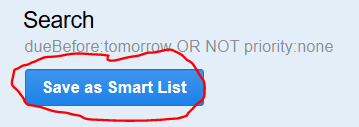
dueBefore:tomorrow or not priority:none
![]()
The “dueBefore:tomorrow” gives you every task that is either due today or due before today, and the “not priority:none” gives you every task that is prioritized.
Once you have the search, you can click on the “Save as Smart List” button and it saves as a Smart List.

You can access the Smart List in the list portion of your screen (the left hand side.

Using Smart Lists In Smart Lists
Once you have set up a Smart List, you can use it in searches to narrow things down further.
Let’s say you have tagged all of your tasks that need to be done on a computer with “computer”. You can then create a Smart List of your planning tasks with your Smart List as a source:
list:”My Smart List” and tag:computer
This will give you everything on your planning that can be done at the computer.
Adding Locations
If you wanted to find all of the tasks that have to be done at the office computer, you would add in the location:
list:”My Smart List” and tag:computer and location:office
By using Smart Lists, and expanding searches based on them, you can create a bunch of segmentations of your task list. This will allow you to truly see what you can do at the moment based on your location and equipment.
Image by goosmurf. Licensed under Creative Commons. Text added.


