Making Digital Planning Fun With Forms
Last month I talked about my foray into a paperless planner system. (See Digital Planner: Moving Away From My Paper Planner and Notebook Apps: Making Digital Planning Work) Today I will conclude that series with my own journal layout.
One of the things that I like about designing my own planners is that I can truly customize what I need; but doing that and then printing them out is a waste of resources. So combining my own forms with what I love about bullet journaling, and putting that into the digital system.
Why Not Plain Ol’ Bullet Journal?
Some folks may ask why I didn’t just go with a plain old grid in my digital journal. “You can do all that fancy decoration by hand, then, right?” They wouldn’t be wrong…with the digital journal I can draw or write just as I could on paper.
But the truth is I am not that artistic. My gifts lie in the musical realm, and I can’t draw a straight line with a ruler. (No, I’m not exaggerating. I always move the ruler as I’m drawing). So combining elements that I like (licensed for re-use, of course) with things I can draw (straight lines with computer rulers that don’t move), I can have a library of things to make the forms fun.
Finding Forms
There are a few people out on the internet (Etsy) who are making forms specifically for digital planning, with the understanding they can be printed as well. They are practical, beautiful, and I can see why people buy them. It’s an out-of-the-box solution, just like picking up a paper planner at the store.
Making Your Own
But just like my objection to pre-printed paper forms, pre-made digital forms never quite work the way that I need them to. So I make my own.
Luckily, making my own forms is something I am used to doing. It can be done in Excel or Word and saved to PDF and imported into the digital journal.
If you want to make your own, I recommend using Word, and following the instructions in this article on how to set up a grid. From there you can use the merge and border tools to set up your form.
Other Graphics
When you make your own forms, you can also add other elements. You can use fun fonts, colors, graphics and more. (Please respect copyright and usage terms!) These could be borders, flags, weather icons, or just fun graphics to enliven your planner.
A Look at My Planner
So here are the pictures of my actual planner.
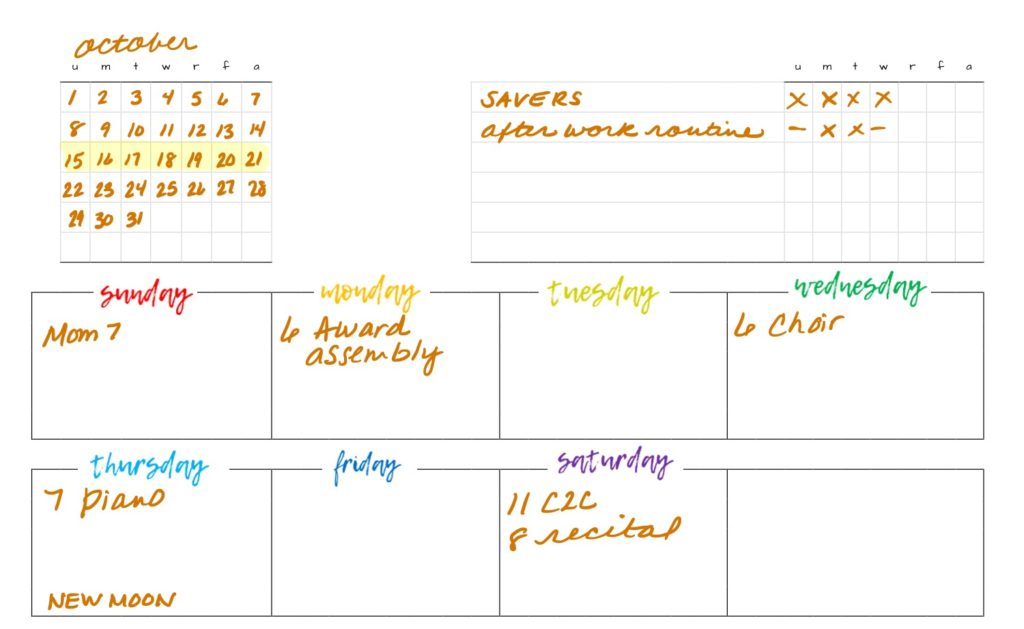
The first page for the week has a calendar at the top. I highlight the week I am on. The right side of the header is a place for me to track habits. Normally there are three habits, but I am currently nursing a broken toe and exercising is off list list. (At some point I am going to learn to wear shoes always)
Below the header I have boxes set out and labeled with the days. The day graphics were just typed into word with a fun font from DAFont, my go-to source for commercially usable fonts. In these boxes I put the schedule for the week.
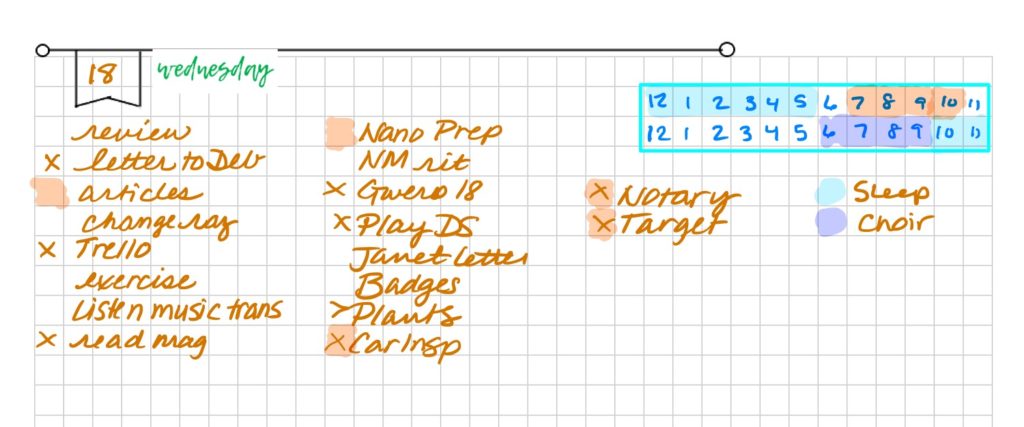
For each day I have a separate area. I use my own graphic for the flag (I can draw straight lines on a computer) and then add the day graphic. Then I draw in my schedule box (which I talked about A Quick And Simple Method To Plan Your Day) and list my tasks. I use the standard bullet journal symbols for marking the status.
Summary
You can do digitial planning by using plain “paper”, buying forms, or creating your own.
Over To You
Have you tried digital planning? Do you do plain paper, purchased forms or make your own? Share below if you want.
Like this article? Share it with a friend!
Image by Big Ben in Japan. Licensed under Creative Commons. Text added.


