
Boost Your Word Productivity With Styles
Mondays are productivity days at SimpleProductivity blog.
This month on Mondays we are going to be looking at how a suite of tools – namely Microsoft Office – can make you more productive. Our second post in the series is one of those power user tricks that is actually really easy to use – and can save a ton of time.
One of the things I really hate to see people doing is formatting a Word document. They select text, then change the font, size, weight and color. Then they repeat it for other like text in the documents. Why do I hate to see it? Because it could be done quickly and easily with styles…and this also makes future formatting changes even easier.
What Are Styles?
Styles are essentially saved formatting information. It can include everything from font formatting (font, size, style, effects, kerning) to paragraph formatting (space before, after, in-between; alignment, margins, tabs) and even more.
When you choose a style, it automatically sets the text to all that formatting information.
It also does more. It also stores that this text is now set as a style…and if you change the style in the future, all your text that is set as that style will change too.
The Value Of Styles
What does this mean?
In the initial round of formatting, it means one click to get everything set — and you don’t forget any attribute. This means no more mismatched sizes, fonts or bolding.
In the later rounds, it means that you change the formatting in one place, and with a couple clicks, the document is updated to match.
How To Use A Style
There are many built-in styles in Word. In order to use them, you click on the appropriate style. In Word 2013, the style box is found on the Home tab, and looks like this:
![]()
There is an easier way, though. If you press Ctrl + Shift + S, you will bring up the Apply Style floating window, which shows everything and allows you to change your styles; and if you click on the Styles button, you will have a list to make it even easier.
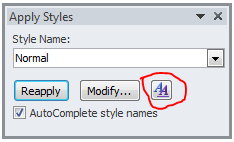
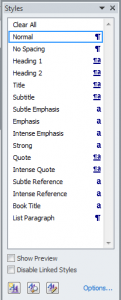
So all you have to do to apply a style is to highlight the text you want to style, and click on the style name (or select it from the drop down list, in the case of the Apply Style window)
So for an example, here is my screen shot before formatting.

And here it is after I have selected the first line and clicked on the Title style

(If you are a total keyboard person, you can do this by choosing the style at the beginning of the paragraph by pressing Ctrl+Shift+S and then typing the style name and pressing enter, which will take you back to the document where you can type the text already formatted)
How To Create A Style
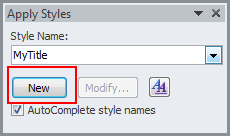
If the styles available in the list don’t suit, you can make your own style. Simply format the text the way you want it, and then bring up the Apply Style window (Ctrl + Shift + S), type the name of your new style in the style name box, and click on New.
How To Change An Existing Style
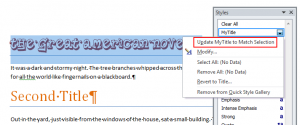
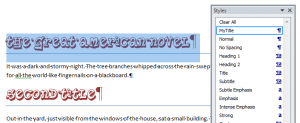
The power of styles really becomes apparent if you decide to change your document to go for a different look. You can change one instance of the style, then modify the style, and the rest of the document will change. Here are a series of illustrations:
Select your text
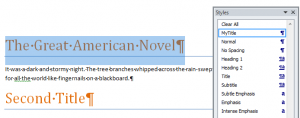
Make the changes
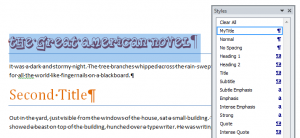
Go to the Style list and choose the down arrow next to the style name, and choose “Update [style name] To Match Selection”
And see the rest of the document change
Conclusion
With the power of styles, I can focus on writing the document, rather than formatting it. Formatting becomes a quick thing to do as I am typing, and then I can change the styles later and have them apply to the whole document. It has saved me countless hours as I work with fitting text into a given space, or change color schemes of a document.
Photo by laptin33. Licensed under Creative Commons.


